Để tạo chuyển động cho màn hình như trên bạn sẽ phải xử lý các animation cho từng view rất phức tạp, mới đầu có thể bạn sẽ nhầm lẫn với CollapsingToolbarLayout trong Android đó. Khi nhìn kỹ lại sẽ không phải vậy đâu nha
 Đáp ứng được yêu cầu trên bạn sẽ phải tạo ra nhiều file (xml - các animation trong anim
folder) rồi gắn cho các view con, tiếp đến là xử lý action drag and
drop cho view group nữa. Nói vậy chứ nhiều việc phải làm đấy!
Đáp ứng được yêu cầu trên bạn sẽ phải tạo ra nhiều file (xml - các animation trong anim
folder) rồi gắn cho các view con, tiếp đến là xử lý action drag and
drop cho view group nữa. Nói vậy chứ nhiều việc phải làm đấy!Hôm nay, mình cùng các bạn sẽ tìm hiểu đến MotionLayout được Google tích hợp vào library ConstraintLayout từ version 2.0, tuy còn khá mới mẻ nhưng từ khi ra đời layout hỗ trợ mạnh mẽ cho các giao diện thiết kế theo Material Design và người dùng tương tác cảm giác nó "Sướng tay" hơn rất nhiều. Vậy có điều gì mình không bắt đầu ngay thôi nào ...?

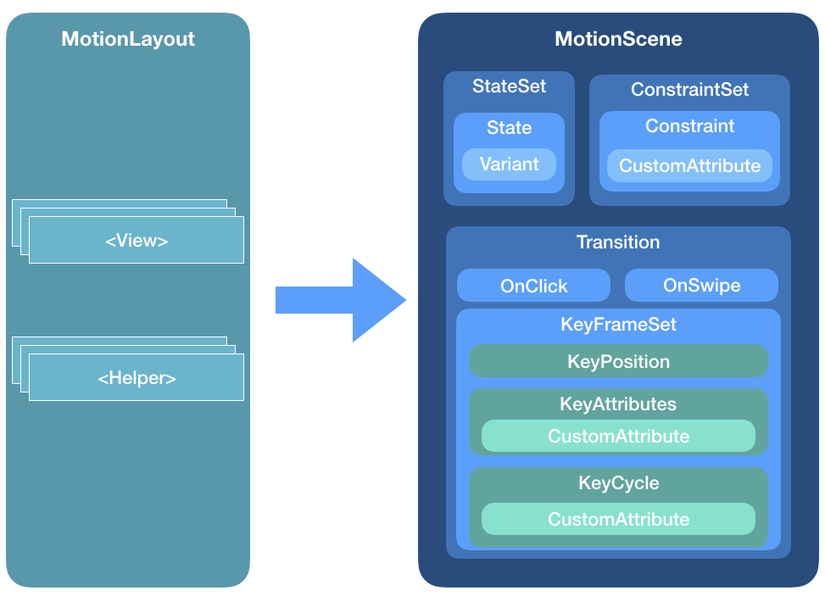
(Hình ảnh cấu trúc toàn bộ MotionLayout)
1. Thành phần cơ bản và cách tích hợp
Tích hợp vào project chỉ 3s thôi, nhanh mà :dependencies {
implementation 'com.android.support.constraint:constraint-layout:2.0.0-beta1'
}
Lý do cấu trúc của MotionLayout rất nhiều nên mình nói tới 2 phần chính trong đó thôi nha, mong rằng bài viết sau mình sẽ cập nhất thêm cho các bạn.
a. MotionScene
Khác với một Layout thông thường mà bạn hay dùng, tất cả bố cục hiển thị với các thông số sẽ được tạo và lưu ở res/xml khác được quyết định bởi MotionScene (hình ảnh). Nó chứa tất cả những gì cần thiết cho animation.
Gồm các thành phần:
- ConstraintSets
- StateSet
- Transition
Đây là một thành phần quan trọng trong MotionScene, như bạn đã thấy ở phần a Điều bắt buộc: 1 MotionLayout luôn phải có ít nhất 2 trạng thái điểm khởi đầu (start) và điểm kết thúc (end) vì vậy nó có ít nhất 2 ConstrainSet
Thành phần:
- Constraint : nơi điều chỉnh các thuộc tính của view trong MotionLayout như: kích thước, màu sắc, ví trí ... Chỉ cần bạn cung cấp chính xác id của view con là nó tự động thực thi cho bạn thôi.
- CustomAttribute: Bạn có thể tạo những thuộc tính riêng cho từng View như dưới đây:
customIntegerValue
customFloatValue
customStringValue
customDimension
customBoolean
Tiếp đến mình sẽ nói một phần của Transition
c. Transition
Ngay cái tên đó cho thấy chức năng của nó rồi, thực hiện việc chuyển đổi các ConstraintSet từ điểm đầu đến điểm cuối theo cách bạn cài đặt. Tất nhiên nó sẽ cần một action mà người dùng tương tác vào view đó. Ở đây nó hỗ trợ 2 action chính:
- OnClick : thao tác click vào view thì thực hiện transition
- OnSwipe: thao tác vuốt từ A >> B
2. Triển khai ví dụ trực tiếp
Có hình ảnh ban đầu, chúng ta thực hiện luôn ví dụ này để cảm nhận một chút khác biệt so với cách thông thường nhé ! Mình sẽ đi từ bước tạo view chính luôn và loại bỏ bước import thư viện vì nó rất đơn giản, mọi người chỉ copy dòng import ở trên của mình vào là xong rồi.Bước đầu mình tạo
motion_info_detail.xml nơi hiển thị view của màn hình Information Detail như sau:motion_info_detail.xml<androidx.constraintlayout.motion.widget.MotionLayout xmlns:android="http://schemas.android.com/apk/res/android"
xmlns:app="http://schemas.android.com/apk/res-auto"
xmlns:tools="http://schemas.android.com/tools"
android:id="@+id/motionLayout"
android:layout_width="match_parent"
android:layout_height="match_parent"
app:layoutDescription="@xml/scene_20">
<ImageView
android:id="@+id/img_detail"
android:layout_width="wrap_content"
android:layout_height="wrap_content"
android:scaleType="centerCrop"
android:visibility="invisible"
app:srcCompat="@drawable/sunset2"
tools:layout_editor_absoluteX="105dp"
tools:layout_editor_absoluteY="115dp" />
<TextView
android:id="@+id/tv_detail"
android:layout_width="wrap_content"
android:layout_height="wrap_content"
android:text="@string/lorem"
tools:layout_editor_absoluteX="88dp"
tools:layout_editor_absoluteY="510dp"
tools:text="@tools:sample/lorem/random" />
<ImageButton
android:id="@+id/ic_info"
android:layout_width="wrap_content"
android:layout_height="wrap_content"
android:background="@drawable/wcircle"
android:tint="#3d76df"
android:onClick="changeState"
app:srcCompat="@drawable/ic_info_black_24dp"
tools:layout_editor_absoluteX="167dp"
tools:layout_editor_absoluteY="434dp" />
<TextView
android:id="@+id/tv_title"
android:layout_width="wrap_content"
android:layout_height="wrap_content"
android:text="Informations"
android:textSize="24sp"
tools:layout_editor_absoluteX="8dp"
tools:layout_editor_absoluteY="465dp" />
<ImageView
android:id="@+id/ic_arrow"
android:layout_width="wrap_content"
android:layout_height="wrap_content"
android:rotation="0"
app:srcCompat="@drawable/ic_keyboard_arrow_right_black_24dp"
tools:layout_editor_absoluteX="264dp"
tools:layout_editor_absoluteY="586dp" />
<com.google.androidstudio.motionlayoutexample.helpers.ArrowFlyinBounceHelper
android:id="@+id/helper"
android:layout_width="wrap_content"
android:layout_height="wrap_content"
app:constraint_referenced_ids="ic_arrow"/>
</androidx.constraintlayout.motion.widget.MotionLayout>
Class đó như sau :
ArrowFlyinBounceHelper.ktclass ArrowFlyinBounceHelper : ConstraintHelper {
protected var mContainer: ConstraintLayout? = null
constructor(context: Context) : super(context) {}
constructor(context: Context, attrs: AttributeSet) : super(context, attrs) {}
constructor(context: Context, attrs: AttributeSet, defStyleAttr: Int) : super(context, attrs,
defStyleAttr) {
}
/**
* @param container
* @hide
*/
override fun updatePreLayout(container: ConstraintLayout) {
if (mContainer !== container) {
val views = getViews(container)
for (i in 0 until mCount) {
val view = views[i]
val animator = ObjectAnimator.ofFloat(view, "translationX", -2000F, 0F).setDuration(1000)
animator.setInterpolator(BounceInterpolator())
animator.start()
}
}
mContainer = container
}
}
scene_info_detail.xml<MotionScene xmlns:android="http://schemas.android.com/apk/res/android"
xmlns:motion="http://schemas.android.com/apk/res-auto" >
<ConstraintSet android:id="@+id/start">
<Constraint
android:id="@id/img_detail"
android:layout_width="0dp"
android:layout_height="match_parent"
android:layout_marginEnd="0dp"
motion:layout_constraintEnd_toEndOf="parent"
motion:layout_constraintStart_toStartOf="parent"
motion:layout_constraintTop_toTopOf="parent"
motion:layout_editor_absoluteX="0dp"
motion:layout_editor_absoluteY="0dp" />
<Constraint
android:id="@id/tv_detail"
android:layout_width="0dp"
android:layout_height="wrap_content"
android:layout_marginStart="16dp"
android:layout_marginLeft="16dp"
android:layout_marginTop="16dp"
android:layout_marginEnd="16dp"
android:layout_marginRight="16dp"
android:alpha="0"
motion:layout_constraintEnd_toEndOf="parent"
motion:layout_constraintStart_toStartOf="parent"
motion:layout_constraintTop_toBottomOf="@+id/tv_title" />
<Constraint
android:id="@id/ic_info"
android:layout_width="48dp"
android:layout_height="48dp"
android:layout_marginEnd="16dp"
android:layout_marginRight="16dp"
android:layout_marginBottom="16dp"
motion:layout_constraintBottom_toBottomOf="parent"
motion:layout_constraintEnd_toEndOf="parent" />
<Constraint
android:id="@id/tv_title"
android:layout_width="wrap_content"
android:layout_height="wrap_content"
android:layout_marginTop="8dp"
android:alpha="0"
motion:layout_constraintStart_toStartOf="@+id/tv_detail"
motion:layout_constraintTop_toBottomOf="@+id/img_detail" />
<Constraint
android:id="@id/ic_arrow"
android:layout_width="wrap_content"
android:layout_height="wrap_content"
android:layout_marginEnd="0dp"
android:layout_marginRight="0dp"
android:rotation="0"
motion:layout_constraintBottom_toBottomOf="@+id/ic_info"
motion:layout_constraintEnd_toStartOf="@+id/ic_info"
motion:layout_constraintTop_toTopOf="@+id/ic_info" />
</ConstraintSet>
<ConstraintSet android:id="@+id/end">
<Constraint
android:id="@id/img_detail"
android:layout_width="0dp"
android:layout_height="426dp"
android:layout_marginTop="0dp"
android:layout_marginBottom="-1dp"
motion:layout_constraintEnd_toEndOf="parent"
motion:layout_constraintTop_toTopOf="parent" />
<Constraint
android:id="@id/tv_detail"
android:layout_width="0dp"
android:layout_height="0dp"
android:layout_marginStart="16dp"
android:layout_marginLeft="16dp"
android:layout_marginTop="16dp"
android:layout_marginEnd="16dp"
android:layout_marginRight="16dp"
android:alpha="1"
motion:layout_constraintBottom_toBottomOf="parent"
motion:layout_constraintEnd_toEndOf="parent"
motion:layout_constraintStart_toStartOf="parent"
motion:layout_constraintTop_toBottomOf="@+id/tv_title" />
<Constraint
android:id="@id/ic_info"
android:layout_width="64dp"
android:layout_height="64dp"
motion:layout_constraintBottom_toBottomOf="@+id/img_detail"
motion:layout_constraintEnd_toEndOf="parent"
motion:layout_constraintStart_toStartOf="parent"
motion:layout_constraintTop_toBottomOf="@+id/img_detail" />
<Constraint
android:id="@id/tv_title"
android:layout_width="wrap_content"
android:layout_height="wrap_content"
android:layout_marginTop="8dp"
android:alpha="1"
motion:layout_constraintStart_toStartOf="@+id/tv_detail"
motion:layout_constraintTop_toBottomOf="@+id/img_detail" />
<Constraint
android:id="@id/ic_arrow"
android:layout_width="wrap_content"
android:layout_height="wrap_content"
android:layout_marginEnd="8dp"
android:layout_marginRight="8dp"
android:layout_marginBottom="0dp"
android:rotation="90"
motion:layout_constraintBottom_toBottomOf="@+id/img_detail"
motion:layout_constraintEnd_toEndOf="parent" />
</ConstraintSet>
<Transition
motion:constraintSetEnd="@+id/end"
motion:constraintSetStart="@+id/start"
motion:duration="1000"
motion:motionInterpolator="linear">
<OnSwipe
motion:touchAnchorId="@+id/img_detail"
motion:touchAnchorSide="bottom"
motion:dragDirection="dragUp" />
<KeyFrameSet>
<KeyAttribute
android:rotation="0"
motion:framePosition="1"
motion:motionTarget="@id/ic_arrow" />
<KeyPosition
motion:framePosition="27"
motion:percentX="-0.2585034"
motion:percentY="0.50630915"
motion:motionTarget="@id/ic_arrow"
motion:keyPositionType="deltaRelative" />
</KeyFrameSet>
</Transition>
</MotionScene>
<ConstraintSet android:id="@+id/start">
        <Constraint
            android:id="@id/img_detail"
            android:layout_width="0dp"
            android:layout_height="match_parent"
            android:layout_marginEnd="0dp"
            motion:layout_constraintEnd_toEndOf="parent"
            motion:layout_constraintStart_toStartOf="parent"
            motion:layout_constraintTop_toTopOf="parent"
            motion:layout_editor_absoluteX="0dp"
            motion:layout_editor_absoluteY="0dp" />

            .... </ConstraintSet>
<ConstraintSet android:id="@+id/end">
        <Constraint
            android:id="@id/img_detail"
            android:layout_width="0dp"
            android:layout_height="426dp"
            android:layout_marginTop="0dp"
            android:layout_marginBottom="-1dp"
            motion:layout_constraintEnd_toEndOf="parent"
            motion:layout_constraintTop_toTopOf="parent" />

            .... </ConstraintSet>
- motion:duration="1000" : delay trong 1s
- motion:motionInterpolator="linear": action swipe được thực thi theo chiều dọc
<OnSwipe
            motion:touchAnchorId="@+id/img_detail"
            motion:touchAnchorSide="bottom"
            motion:dragDirection="dragUp" />
Comments
Post a Comment