Các ứng dụng sử dụng Indicator Library: Github
hardcode
vì đợt đó code khá vội và mục đích chủ yếu là để mô phỏng nên cảm thấy
hơi có lỗi với anh em. Vậy nên bài này mình sẽ trình bày một số khái
niệm cũng như yếu tố cơ bản khi custom một view nào đó, sau đó sẽ cùng anh em xây dựng một library Indicator
"kinh điển" nho nhỏ để chuyển hóa lý thuyết thành thực tiễn. Động tác
"warm up" này sẽ làm tiền để cho một demo khá khoai ở bài sau (cuối bài
này mình sẽ cung cấp design cho ae chuẩn bị Èo! Vẫn chưa "bon" mồm lắm, chém thêm tí nữa nhé. Trong lĩnh vực làm Outsource hay Product thì việc Custom View là vô cùng quan trọng. Như Outsource thì làm sản phẩm một cách nhanh nhất để tiết giảm chi phí, vậy nên ta sử dụng một số UI library có License phù hợp để thêm vào sản phẩm, tuy nhiên thì thiết kế của KH có thể sẽ khác so với library mà ta kiếm được. Chính vì thế chúng ta sẽ dựa vào library có sẵn đó rồi mông má lại sao cho giống thiết kế. Còn với Product muốn thành công, yếu tố UI cũng đóng vai trò quan trọng không kém nội dung, yếu tố độc và lạ của designer lại càng khiến cho việc Custom View quan trọng hơn bao giờ hết. Hi vọng sau khi trải qua series này, anh em sẽ tự tin thách thức mọi thiết kế UX/UI (chém thui
View
Như anh em đã biết (hoặc có thể không biết) thì tất cả các component widget mà chúng ta thường sử dụng nhưTextView, Edittex, Checkbox,... Tất cả những thứ đó dù cha ông nó là gì đi nữa, thì cuối cùng vẫn là "đệ" của View. Ví dụ như EditText extends TextView rồi thì TextView extends View. Bộ Android SDK chỉ cung cấp cho ta những component cơ bản, hay những bản support cung cấp cho ta các component theo hướng Material Design để rồi từ đó mà các vị cao nhân dựa vào đó nấu nướng lên các library UI đẹp mê hồn Cũng như
Activity, Fragment, Service,... Thì View
cũng có vòng đời của nó. Tuy nhiên thì Google không có một tài liệu
chính thống nào cho nó, mà hình ảnh dưới đây hoàn toàn là do kinh nghiêm
ông cha ta đúc kết lại. 
Constructor
-
View(Context context)constructor này sẽ được sử dụng khi mà chúng ta add view lúc runtime. -
View(Context context, AttributeSet attrs)constructor này sẽ được sử dụng khi chúng ta khai báoviewtrong XML (file layout xml á). -
View(Context context, AttributeSet attrs, int defStyleAttr)cũng dùng trong XML nhưng thêm 1 tham số đó là các thuộc tính style của theme mặc định. -
MyView(Context context, AttributeSet attrs, int defStyleAttr, int defStyleRes)như cái 3 nhưng có thêm tham số để truyền style riêng thông qua resource.
Khi mọi người dùng 1 library thì sẽ khá quen thuộc với các usage kiểu như thế này:

2 thuộc tính matProg_... mà mình khoanh tròn đó dùng để người sử dụng library có thể custom chút xíu mà người viết library cung cấp. Nếu không có những cái đó thì hẳn là có 1 default nào đó. Vậy library
Indicator mà chúng ta chuẩn bị xây dựng cũng phải cho phép người sử dụng custom tí chứ nhỉ, chứ ai lại hardcode như thằng Facebook Reaction kia.Attribute (Đọc để biết thui, tí đến lúc code mình sẽ nói rõ từng bước)
Để xác định các thành phần đó ta sử dụng cáiAttributeSet ý, và khởi tạo nó qua file attrs.xml:<?xml version="1.0" encoding="utf-8"?>
<resources>
<declare-styleable name="IndicatorView">
<attr name="hado_radius_selected" format="dimension" />
<attr name="hado_radius_unselected" format="dimension" />
<attr name="hado_color_selected" format="color" />
<attr name="hado_color_unselected" format="color" />
<attr name="hado_distance" format="dimension" />
</declare-styleable>
</resources>
selected và unselected, màu, khoảng cách giữa các chấm tròn.onMeasure
Có khi nào bạn đặt câu hỏi làm sao mà các thành phần chúng ta thiết kế trong file xml lại hiển thị ngon lành trên màn hình không nhỉ?View này nằm dưới View
kia, bên cạnh thằng này, bên cạnh thằng kia,... Có thể bạn chỉ nghĩ đơn
giản đó là việc của các câu lệnh xml mà thui, nhưng để từ những dòng
xml đó chuyển thành hình các View đúng kích thước, đúng vị
trí trên màn hình lại cả là một vấn đề, nó giống như việc chúng ta chỉ
đang làm việc với interface của nó thui vậy.Đầu tiên, giao diện có 2 thành phần chính đó là
view cha (ViewGroup) và view con, các view con sẽ nằm trong view cha. Chúng ta có thể xác định kích thước của các view thông qua code Java là LayoutParams() hoặc trong XML là layout_width, layout_height. Để view cha có thể tính toán và sắp xếp các view con của nó một cách hòa thuận, thì cơ bản sẽ như thế này. Khi method onMeasure của view cha được thực hiện, view cha sẽ tìm và coi các thông số (width & height) của tất cả các view con và tính toán xem đứa con đó kích thước sẽ nên như thế nào dựa trên không gian khả dụng và thông số các view con đó yêu cầu muốn có. Sau đó nó sẽ thiết lập các liên kết, rồi chuyển thông tin kích cỡ và lời nhắn thông qua MeasureSpec đến các đứa con của mình (thông tin này sẽ được view con nhận tại method onMeasure của nó). Lời nhắn có thể sẽ mang những ý nghĩa như này AT_MOST: "Dù thế nào đi nữa thì con cũng chỉ cao 400dp mà thôi", hoặc EXACTLY: "Con nhất định phải cao 400dp", hoặc UNSPECIFIED: "Con muốn như thế nào thì tùy ý con".protected void onMeasure(int widthMeasureSpec, int heightMeasureSpec) {
int widthMode = MeasureSpec.getMode(widthMeasureSpec);
int widthSize = MeasureSpec.getSize(widthMeasureSpec);
int heightMode = MeasureSpec.getMode(heightMeasureSpec);
int heightSize = MeasureSpec.getSize(heightMeasureSpec);
//desiredWidth: dựa vào nội dung muốn hiển thị mà bạn sẽ tính ra bạn cần tối thiểu bao nhiêu
//không gian để bạn hiển thị
...
int width;
if (widthMode == MeasureSpec.EXACTLY) {
width = widthSize;
} else if (widthMode == MeasureSpec.AT_MOST) {
width = Math.min(desiredWidth, widthSize);
} else {
width = desiredWidth;
}
...
}
- MeasureSpec.EXACTLY: điều này nghĩa là chúng ta đã xác định cứng kích thước trong xml, như kiểu
layout_width=300dp. - MeasureSpec.AT_MOST: không nên vượt quá giới hạn này, vậy nên mới sử dụng câu lệnh
Math.min(desiredWidth, widthSize). - MeasureSpec.UNSPECIFIED: cho bạn thỏa sức, nhưng chúng ta chỉ cần những gì chúng ta thực sự cần mà thôi
width = desiredWidth.
view con tính toán xong việc nó cần kích thước như thế nào thì gọi đến method setMeasuredDimension để xác nhận, view cha sẽ nhận được thông tin đó và sẽ còn phải tính toán thêm vài lần nữa mới kết thúc, đoạn này chúng ta chưa cần quan tâm.onLayout
Tại phương thức này thì mọi chuyện đã xong, kích thước đã được set cho tất cả cácview con, lúc này chúng ta dùng lệnh getWidth, getHeight thì mới có giá trị, chứ ở các method trước chưa tính toán xong thì chỉ có = 0 mà thui.onDraw
Đây chính là nơi mà chúng ta sẽ thể hiện tài năng hội họa của mình. Ta cóCanvas một tờ giấy trắng không tì vết (thực ra nó trong suốt :v), cùng với Paint chúng ta sẽ thỏa sức sáng tạo, vẽ bất cứ thứ gì chúng ta muốn.Ghi nhớ một điều khi chúng ta vẽ rằng,onDrawđược gọi rất nhiều lần, vậy nên chúng ta không nên khởi tạo đối tượng ở trong phương thức này, mà chỉ nên dùng lại các đối tượng đã tạo ở các phương thức khác. Tất nhiên IDE sẽ thông báo warning nếu bạn new một đối tượng trongonDraw, tuy nhiên nó không thể phán đoán được hết mọi trường hợp nếu chúng ta khởi tạo đối tượng ở phương thức khác, và rồi gọi phương thức đó trongonDraw.
View Update
Có thể tưởng tượng rằng, việc custom mộtview như là việc làm ra một flipbook dưới đây:
Canvas nó giống như là 1 tờ giấy trên hình vậy, việc bạn
phải làm đó là vẽ lên nó ở các thời điểm nhất định, mỗi lần vẽ là một
trang giấy trắng. Để thực hiện onDraw thì ta sẽ gọi phương thức invalidate.Phù ~~ Lý thuyết nhiều quá nhỉ, hi vọng mọi người không quá nhàm chán với nó và cố gắng hiểu nó, vì mình đã thực sự rất tiếc những khoảng thời gian mà mình không hiểu nó. Bất cứ điều gì thắc mắc mọi người comment ở dưới nhé, mình sẽ trả lời sớm nhất có thể.
Xây dựng thư viện Indicator
"Ơn giời code đây rồi". Library Indicator đầu tiên mình sử dụng đó là của anh Jake Wharton một trong những tốp siêu sayda kinh khủng khiếp mà mình ngưỡng mộTạo Module
Việc tạo module như thế này, mai sau chỉ cần import vào là xong.File > New > New Module. Sau đó chọn Android Library rùi Next nhé, điền tên library xong Finish nhé.Đây là của mình sau khi tạo xong:

app nhé. Bật file build.gradle level app (Module: app):dependencies {
...
compile project (':indicatorlibrary')
...
}
Tạo Attribute
Tiếp đến là ta sẽ tạo 1 fileattrs.xml để cho người sử dụng có thể tùy biến library của ta 1 chút:
<?xml version="1.0" encoding="utf-8"?>
<resources>
    <declare-styleable name="IndicatorView">
        <attr name="hado_radius_selected" format="dimension" />
        <attr name="hado_radius_unselected" format="dimension" />

        <attr name="hado_color_selected" format="color" />
        <attr name="hado_color_unselected" format="color" />

        <attr name="hado_distance" format="dimension" />
    </declare-styleable>
</resources>
hado vào để nhằm phân biệt với các library khác, cái này để tránh việc khi mà sử dụng 2 library có attribute cùng tên.Tạo Indicator Interface
Tạo một interfaceIndicatorInterface dùng để thiết lập các hành động mà người dùng có thể tương tác với library:public interface IndicatorInterface {
void setViewPager(ViewPager viewPager) throws PagesLessException;
void setAnimateDuration(long duration);
/**
*
* @param radius: radius in pixel
*/
void setRadiusSelected(int radius);
/**
*
* @param radius: radius in pixel
*/
void setRadiusUnselected(int radius);
/**
*
* @param distance: distance in pixel
*/
void setDistanceDot(int distance);
}
PagesLessException:public class PagesLessException extends Exception {
@Override
public String getMessage() {
return "Pages must equal or larger than 2";
}
}
ViewPager có ít hơn 2 page.Tạo class Dot
Class này có trách nghiệm vẽ lên các chấm tròn.public class Dot {
private Paint paint;
private PointF center;
private int currentRadius;
public Dot() {
paint = new Paint();
paint.setAntiAlias(true);
center = new PointF();
}
public void setColor(int color) {
paint.setColor(color);
}
public void setAlpha(int alpha) {
paint.setAlpha(alpha);
}
public void setCenter(float x, float y) {
center.set(x, y);
}
public int getCurrentRadius() {
return currentRadius;
}
public void setCurrentRadius(int radius) {
this.currentRadius = radius;
}
public void draw(Canvas canvas) {
canvas.drawCircle(center.x, center.y, currentRadius, paint);
}
}
Tạo class IndicatorView
Class này sẽ đảm nhiệm việc vẽ cách chấm tròn tương ứng với số page trongViewPager và lắng nghe sự di chuyển các page để thực hiện animation vẽ các chấm tròn tương ứng với trạng thái.public class IndicatorView extends View implements IndicatorInterface, ViewPager.OnPageChangeListener {
private static final long DEFAULT_ANIMATE_DURATION = 200;
private static final int DEFAULT_RADIUS_SELECTED = 20;
private static final int DEFAULT_RADIUS_UNSELECTED = 15;
private static final int DEFAULT_DISTANCE = 40;
private ViewPager viewPager;
private Dot[] dots;
private long animateDuration = DEFAULT_ANIMATE_DURATION;
private int radiusSelected = DEFAULT_RADIUS_SELECTED;
private int radiusUnselected = DEFAULT_RADIUS_UNSELECTED;
private int distance = DEFAULT_DISTANCE;
private int colorSelected;
private int colorUnselected;
private int currentPosition;
private int beforePosition;
private ValueAnimator animatorZoomIn;
private ValueAnimator animatorZoomOut;
public IndicatorView(Context context) {
super(context);
}
public IndicatorView(Context context, AttributeSet attrs) {
super(context, attrs);
}
public IndicatorView(Context context, AttributeSet attrs, int defStyleAttr) {
super(context, attrs, defStyleAttr);
}
@Override
protected void onLayout(boolean changed, int left, int top, int right, int bottom) {
super.onLayout(changed, left, top, right, bottom);
}
@Override
protected void onMeasure(int widthMeasureSpec, int heightMeasureSpec) {
}
@Override
protected void onDraw(Canvas canvas) {
}
@Override
public void setViewPager(ViewPager viewPager) throws PagesLessException {
this.viewPager = viewPager;
viewPager.addOnPageChangeListener(this);
}
private void initDot(int count) throws PagesLessException {
}
@Override
public void setAnimateDuration(long duration) {
this.animateDuration = duration;
}
@Override
public void setRadiusSelected(int radius) {
this.radiusSelected = radius;
}
@Override
public void setRadiusUnselected(int radius) {
this.radiusUnselected = radius;
}
@Override
public void setDistanceDot(int distance) {
this.distance = distance;
}
@Override
public void onPageScrolled(int position, float positionOffset, int positionOffsetPixels) {
}
@Override
public void onPageSelected(int position) {
}
private void changeNewRadius(int positionPerform, int newRadius) {
}
@Override
public void onPageScrollStateChanged(int state) {
}
}
IndicatorView(Context context, AttributeSet attrs)public IndicatorView(Context context, AttributeSet attrs) {
super(context, attrs);
TypedArray typedArray = context.obtainStyledAttributes(attrs, R.styleable.IndicatorView);
this.radiusSelected = typedArray.getDimensionPixelSize(R.styleable.IndicatorView_hado_radius_selected, DEFAULT_RADIUS_SELECTED);
this.radiusUnselected = typedArray.getDimensionPixelSize(R.styleable.IndicatorView_hado_radius_unselected, DEFAULT_RADIUS_UNSELECTED);
this.distance = typedArray.getInt(R.styleable.IndicatorView_hado_distance, DEFAULT_DISTANCE);
this.colorSelected = typedArray.getColor(R.styleable.IndicatorView_hado_color_selected, Color.parseColor("#ffffff"));
this.colorUnselected = typedArray.getColor(R.styleable.IndicatorView_hado_color_unselected, Color.parseColor("#ffffff"));
typedArray.recycle();
}
default sẵn của ta.Method
initDot:private void initDot(int count) throws PagesLessException {
if (count < 2) throw new PagesLessException();
dots = new Dot[count];
for (int i = 0; i < dots.length; i++) {
dots[i] = new Dot();
}
}
count ở đây là số page, chúng ta chỉ phục vụ cho những ViewPager nào có 2 page trở lên thui, nếu nhỏ hơn sẽ ném ra Exception. Sau đó thì khởi tạo các Dot để chuẩn bị vẽ chúng lên.Method
setViewPager:@Override
public void setViewPager(ViewPager viewPager) throws PagesLessException {
this.viewPager = viewPager;
viewPager.addOnPageChangeListener(this);
initDot(viewPager.getAdapter().getCount());
onPageSelected(0);
}
setViewPager ta sẽ khởi tạo các Dot dựa vào số page mà ta lấy được ở viewPager. Nhìn lại method initDot có thể thấy rằng mình không xác định tâm và bán kính cho chúng vì bởi lẽ muốn xác định nó thì cần phải có width và height của view, mà thời điểm này ta chưa thể biết rằng liệu width và height đã được tính toán xong chưa. Để muốn biết khi nào nó được tính xong thì cùng xem lại bức ảnh về vòng đời của view nhé. onLayout là phương thức mà khi các tính toán đã hoàn thành, vậy ta sẽ xác định tâm và bán kính của các chấm tròn ở đó nhé.Method
onLayout@Override
protected void onLayout(boolean changed, int left, int top, int right, int bottom) {
super.onLayout(changed, left, top, right, bottom);
float yCenter = getHeight() / 2;
int d = distance + 2 * radiusUnselected;
float firstXCenter = (getWidth() / 2) - ((dots.length - 1) * d / 2);
for (int i = 0; i < dots.length; i++) {
dots[i].setCenter(i == 0 ? firstXCenter : firstXCenter + d * i, yCenter);
dots[i].setCurrentRadius(i == currentPosition ? radiusSelected : radiusUnselected);
dots[i].setColor(i == currentPosition ? colorSelected : colorUnselected);
dots[i].setAlpha(i == currentPosition ? 255 : radiusUnselected * 255 / radiusSelected);
}
}

view nên sẽ cùng 1 tọa độ y: yCenter = <Chiều cao view> / 2.Tọa độ x của chấm đầu tiên (
firstXCenter) sẽ được tính theo công thức: (<Chiều rộng view> / 2) - ((<Số chấm> - 1) * <Khoảng cách tâm giữa các chấm> / 2).
Từ đó cứ dựa vào thứ tự các chấm mà tính tọa độ x của nó, tọa độ này sẽ
cố định và không bị thay đổi, chỉ có bán kính mới thay đổi thui.Method
onMeasure@Override
protected void onMeasure(int widthMeasureSpec, int heightMeasureSpec) {
int desiredHeight = 2 * radiusSelected;
int width;
int height;
int widthMode = MeasureSpec.getMode(widthMeasureSpec);
int heightMode = MeasureSpec.getMode(heightMeasureSpec);
int widthSize = MeasureSpec.getSize(widthMeasureSpec);
int heightSize = MeasureSpec.getSize(heightMeasureSpec);
if (widthMode == MeasureSpec.EXACTLY) {
width = widthSize;
} else if (widthMode == MeasureSpec.AT_MOST) {
width = widthSize;
} else {
width = 0;
}
if (heightMode == MeasureSpec.EXACTLY) {
height = heightSize;
} else if (widthMode == MeasureSpec.AT_MOST) {
height = Math.min(desiredHeight, heightSize);
} else {
height = desiredHeight;
}
setMeasuredDimension(width, height);
}
desiredHeight là chiều cao mong muốn có được, ở trong
trường hợp này thì ta cần chiều cao tối thiểu đó là bằng 2 lần bán kính
chấm tròn lúc được chọn desiredHeight = 2 * radiusSelected, những phần code dưới mọi người kéo lên trên phần mình giải thích ở onMeasure để hiểu hơn nhé.Method
onPageSelected@Override
public void onPageSelected(int position) {
beforePosition = currentPosition;
currentPosition = position;
if (beforePosition == currentPosition) {
beforePosition = currentPosition + 1;
}
AnimatorSet animatorSet = new AnimatorSet();
animatorSet.setDuration(animateDuration);
animatorZoomIn = ValueAnimator.ofInt(radiusUnselected, radiusSelected);
animatorZoomIn.addUpdateListener(new ValueAnimator.AnimatorUpdateListener() {
int positionPerform = currentPosition;
@Override
public void onAnimationUpdate(ValueAnimator valueAnimator) {
int newRadius = (int) valueAnimator.getAnimatedValue();
changeNewRadius(positionPerform, newRadius);
}
});
animatorZoomOut = ValueAnimator.ofInt(radiusSelected, radiusUnselected);
animatorZoomOut.addUpdateListener(new ValueAnimator.AnimatorUpdateListener() {
int positionPerform = beforePosition;
@Override
public void onAnimationUpdate(ValueAnimator valueAnimator) {
int newRadius = (int) valueAnimator.getAnimatedValue();
changeNewRadius(positionPerform, newRadius);
}
});
animatorSet.play(animatorZoomIn).with(animatorZoomOut);
animatorSet.start();
}
ViewPager
thay đổi page, page được chọn thì chấm tương ứng sẽ phóng to ra, còn
page trước đó được chọn sẽ thu nhỏ lại. Vì muốn thực hiện 2 thao tác này
một lúc nên ta dùng AnimatorSet để kết hợp 2 animation.Method
changeNewRadiusprivate void changeNewRadius(int positionPerform, int newRadius) {
if (dots[positionPerform].getCurrentRadius() != newRadius) {
dots[positionPerform].setCurrentRadius(newRadius);
dots[positionPerform].setAlpha(newRadius * 255 / radiusSelected);
invalidate();
}
}
setAlpha chỉ được thực hiện sau setColor thì mới có tác dụng), sau đó gọi method invalidate() để vẽ lại, đồng nghĩa với việc method onDraw sẽ được thực hiện.Method
onDraw@Override
protected void onDraw(Canvas canvas) {
for (Dot dot : dots) {
dot.draw(canvas);
}
}
Vậy là công việc viết library đã xong, giờ là lúc ta implements nó
Implement
Quay lại với app chính của ta nào, ởactivity_main.xml ta tạo một ViewPager và IndicatorView nhé:<?xml version="1.0" encoding="utf-8"?>
<RelativeLayout xmlns:android="http://schemas.android.com/apk/res/android"
xmlns:app="http://schemas.android.com/apk/res-auto"
xmlns:tools="http://schemas.android.com/tools"
android:id="@+id/activity_main"
android:layout_width="match_parent"
android:layout_height="match_parent"
tools:context="com.hado.indicator.MainActivity">
<android.support.v4.view.ViewPager
android:id="@+id/viewPager"
android:layout_width="match_parent"
android:layout_height="match_parent"/>
<com.hado.indicatorlibrary.IndicatorView
android:id="@+id/indicator"
android:layout_width="match_parent"
android:layout_height="wrap_content"
android:layout_alignParentBottom="true"
android:layout_marginBottom="20dp"
app:hado_radius_selected="10dp"
app:hado_radius_unselected="5dp" />
</RelativeLayout>
Adapter và các Page mọi người tự túc ha. Để sử dụng IndicatorView thì chỉ cần làm đơn giản như các library hay dùng thui:...
viewPager.setAdapter(adapter);
try {
indicatorView.setViewPager(viewPager);
} catch (PagesLessException e) {
e.printStackTrace();
}
...
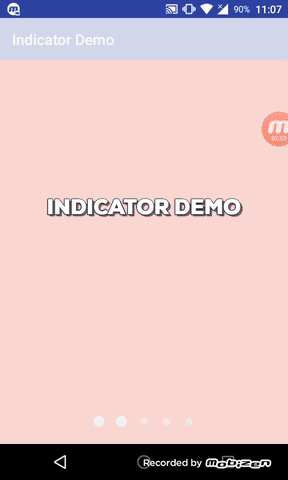
Adapter cho ViewPager thì cùng run app nhé. Đây là kết quả của mình:Zô lô! vậy là đã hoàn thành library đầu tay. Hi vọng anh em sẽ nghiền ngẫm bài này lâu hơn, thử các trường hợp, áp dụng kiến thức bài này để làm lại Facebook Reaction,... Tất cả để chuẩn bị cho bài tới khoai khoai.
Comments
Post a Comment